Zimbra – System Requirement for CentOS
- A domain name
- A cloud, VPS, or dedicated server based on your need.
But your system should meet the following minimum configuration as per the Zimbra documentation.
- CPU – 1.5 Ghz
- Memory – 8 GB
- Storage – 5 GB for ZCS installation
Initial Domain Setup
First of all create 2 DNS entries in the domain records as follows
| Type | Host | Value |
| A | 1.2.3.4 | |
| MX | @ | mail.yourdomain.com 10 |
Initial Server Setup
First of all, switch to root user, just in case if you not working as root user.
| 123 | [root@mail ~]# sudo -i[root@mail ~]# yum update -y[root@mail ~]# yum install nano -y |
Disable SElinux
After that disable SElinux. Though it is great for OS security it will interfere with our installation. Later, we will enable the firewall on our system. To do that, open the /etc/selinux/config file.
| 1 | [root@mail ~]# nano /etc/selinux/config |
Edit the content below.
# This file controls the state of SELinux on the system.
# SELINUX= can take one of these three values:
# enforcing – SELinux security policy is enforced.
# permissive – SELinux prints warnings instead of enforcing.
# disabled – No SELinux policy is loaded.
SELINUX=disabled
# SELINUXTYPE= can take one of these two values:
# targeted – Targeted processes are protected,
# minimum – Modification of targeted policy. Only selected processes are protected.
# mls – Multi Level Security protection.
SELINUXTYPE=targeted
Set up hostname
You must set up hostname for the server before installing. Your domain is yourdomain.com, so you should set hostname for the server is mail.yourdomain.com.
| 1 | [root@mail ~]# hostnamectl set-hostname mail.yourdomain.com |
Set up hosts file
You also need to set the server’s /etc/hosts file. Open the file and add the following content.
| 1 | [root@mail ~]# nano /etc/hosts |
127.0.0.1 localhost localhost.localdomain localhost4 localhost4.localdomain4
192.168.10.10 mail.yourdomain.com mail
Set up network card
Suppose your server has a public card on the internet named ens192. Open its configuration file and make sure DNS1 is your server’s IP.
| 1234 | [root@mail ~]# cd /etc/sysconfig/network-scripts[root@mail ~]# ls[root@mail ~]# nano ens192[root@mail ~]# cd ~ |
Content like below.
HWADDR=00:51:56:a3:e3:d9
NAME=ens192
GATEWAY=192.168.10.1
DNS1=192.168.10.10
DNS2=8.8.8.8
DNS3=8.8.4.4
DEVICE=ens192
ONBOOT=yes
USERCTL=no
BOOTPROTO=static
NETMASK=255.255.255.0
IPADDR=192.168.10.10
PEERDNS=no
Then, type the following command to restart the network service.
| 12 | [root@mail ~]# systemctl restart network[root@mail ~]# systemctl restart NetworkManager.service |
Check the file /etc/resolv.conf
After restarting the network service, check the /etc/resolv.conf file to make sure DNS1 is always your own mail server.
| 123456 | [root@mail ~]# cat /etc/resolv.conf # Generated by NetworkManagersearch yourdomain.comnameserver 192.168.10.10nameserver 8.8.8.8nameserver 8.8.4.4 |
If the answer of resolv.conf is not the same as above then edit it, and make the changes.
| 1 | [root@mail ~]# nano /etc/resolv.conf |
Perhaps more than 90% of Zimbra installation errors are related to DNS issues. Therefore, if you do not do this correctly, your mail server will fail.
Reboot your server
After you have done all the above preparation steps correctly, you must reboot the server (to SElinux disable).
Simply type the reboot command.
| 1 | [root@mail ~]# reboot |
Install DNS for Zimbra mail server
I have encountered many errors when installing Zimbra, the main reason is due to DNS. Basically, Zimbra comes with Zimbra-DNS Cache package, which will install local DNS on your MTA server. This helps queries out the internet faster.
However, we are installing single server, so the MTA is in a single server. Therefore, before installing Zimbra, we need to install the DNS server and it will be right on the Zimbra mail server.
Now, use the following command to install DNS packages.
| 1 | [root@mail ~]# yum install bind bind-utils -y |
Configure /etc/named.conf file
Next, you edit the /etc/named.conf file as follows.
| 1 | [root@mail ~]# nano /etc/named.conf |
//
// named.conf
//
// Provided by Red Hat bind package to configure the ISC BIND named(8) DNS
// server as a caching only nameserver (as a localhost DNS resolver only).
//
// See /usr/share/doc/bind*/sample/ for example named configuration files.
//
// See the BIND Administrator’s Reference Manual (ARM) for details about the
// configuration located in /usr/share/doc/bind-{version}/Bv9ARM.html
options {
listen-on port 53 { 127.0.0.1; 192.168.10.10; };
listen-on-v6 port 53 { ::1; };
directory “/var/named”;
dump-file “/var/named/data/cache_dump.db”;
statistics-file “/var/named/data/named_stats.txt”;
memstatistics-file “/var/named/data/named_mem_stats.txt”;
recursing-file “/var/named/data/named.recursing”;
secroots-file “/var/named/data/named.secroots”;
allow-query { localhost; 192.168.10.10; };
/*
– If you are building an AUTHORITATIVE DNS server, do NOT enable recursion.
– If you are building a RECURSIVE (caching) DNS server, you need to enable
recursion.
– If your recursive DNS server has a public IP address, you MUST enable access
control to limit queries to your legitimate users. Failing to do so will
cause your server to become part of large scale DNS amplification
attacks. Implementing BCP38 within your network would greatly
reduce such attack surface
*/
recursion yes;
dnssec-enable yes;
dnssec-validation yes;
/* Path to ISC DLV key */
bindkeys-file “/etc/named.iscdlv.key”;
managed-keys-directory “/var/named/dynamic”;
pid-file “/run/named/named.pid”;
session-keyfile “/run/named/session.key”;
forwarders { 8.8.8.8; };
};
logging {
channel default_debug {
file “data/named.run”;
severity dynamic;
};
};
zone “.” IN {
type hint;
file “named.ca”;
};
zone “yourdomain.com” {
type master;
file “yourdomain.com.zone”;
};
include “/etc/named.rfc1912.zones”;
include “/etc/named.root.key”;
Please note the following in /etc/named.conf.
listen-on port 53 { 127.0.0.1; 103.95.198.193; };: Add your server’s IP to this lineallow-query { localhost; 103.95.198.193; };: Add your server’s IP to this lineforwarders { 8.8.8.8; };: Add this line at the end of the options block- At last, add a zone (as shown below) for your domain (at the place as shown above).
zone “yourdomain.com” {
type master;
file “yourdomain.com.zone”;
};
Create a domain zone file
Now, you have to create the file zone for the domain using the following command.
| 1 | [root@mail ~]# nano /var/named/yourdomain.com.zone |
After that, add the following content to the file and save it, note the edit information for matching your server and domain.
;
; BIND data file for local loopback interface
;
$TTL 86400
@ IN SOA ns1.yourdomain.com. root.yourdomain.com. (
2021051001 ; Serial
604800 ; Refresh
86400 ; Retry
2419200 ; Expire
604800 ) ; Negative Cache TTL
;
; name servers – NS records
@ IN NS ns1.yourdomain.com.
@ MX 10 mail.yourdomain.com.
; name servers – A records
ns1 IN A 192.168.10.10
mail IN A 192.168.10.10
Start the DNS service and check the record
Next, type the following command to enable and start the DNS service.
| 1 | [root@mail ~]# systemctl enable named && systemctl start named |
You can then check the record with the following 2 commands.
| 12 | [root@mail ~]# dig -t A mail.yourdomain.com[root@mail ~]# dig -t MX yourdomain.com |
Install Zimbra
Remove Postfix and install dependencies
First, you need to turn off the Postfix service if it is running and then disable it. Just run the following command and it will do both.
| 1 | [root@mail ~]# systemctl stop postfix && systemctl disable postfix |
Next, you type the below command to install dependencies for Zimbra.
| 1 | [root@mail ~]# yum install unzip net-tools sysstat openssh-clients perl-core libaio nmap-ncat libstdc++ wget -y |
Download the package and install Zimbra 8.8.15 in CentOS 8
First, we will create a folder called zimbra. This folder is for downloading the Zimbra installation package to your server.
| 1 | [root@mail ~]# mkdir zimbra && cd zimbra |
Next, type the following command to download the Zimbra package 8.8.15 to the server.
| 1 | [root@mail zimbra]# wget https://files.zimbra.com/downloads/8.8.15_GA/zcs-8.8.15_GA_3953.RHEL8_64.20200629025823.tgz |
Then, extract the installation package.
| 12 | [root@mail zimbra]# yum install tar -y[root@mail zimbra]# tar zxpvf zcs-8.8.15_GA_3953.RHEL8_64.20200629025823.tgz |
Now, move to the unzipped folder.
| 1 | [root@mail zimbra]# cd zcs-8.8.15_GA_3953.RHEL8_64.20200629025823 |
And finally, type the following command to install Zimbra 8.8.15.
| 1 | [root@mail zcs-8.8.15_GA_3953.RHEL8_64.20200629025823]# ./install.sh |
The installation process will take place as below.
| 1234567891011121314151617181920212223242526272829303132333435363738394041 | [root@mail zcs-8.8.12_GA_3794.RHEL7_64.20190329045002]# ./install.shOperations logged to /tmp/install.log.j5mRhLRWChecking for existing installation... zimbra-drive...NOT FOUND zimbra-imapd...NOT FOUND zimbra-patch...NOT FOUND zimbra-mta-patch...NOT FOUND zimbra-proxy-patch...NOT FOUND zimbra-license-tools...NOT FOUND zimbra-license-extension...NOT FOUND zimbra-network-store...NOT FOUND zimbra-network-modules-ng...NOT FOUND zimbra-chat...NOT FOUND zimbra-talk...NOT FOUND zimbra-ldap...NOT FOUND zimbra-logger...NOT FOUND zimbra-mta...NOT FOUND zimbra-dnscache...NOT FOUND zimbra-snmp...NOT FOUND zimbra-store...NOT FOUND zimbra-apache...NOT FOUND zimbra-spell...NOT FOUND zimbra-convertd...NOT FOUND zimbra-memcached...NOT FOUND zimbra-proxy...NOT FOUND zimbra-archiving...NOT FOUND zimbra-core...NOT FOUND----------------------------------------------------------------------PLEASE READ THIS AGREEMENT CAREFULLY BEFORE USING THE SOFTWARE.SYNACOR, INC. ("SYNACOR") WILL ONLY LICENSE THIS SOFTWARE TO YOU IF YOUFIRST ACCEPT THE TERMS OF THIS AGREEMENT. BY DOWNLOADING OR INSTALLINGTHE SOFTWARE, OR USING THE PRODUCT, YOU ARE CONSENTING TO BE BOUND BYTHIS AGREEMENT. IF YOU DO NOT AGREE TO ALL OF THE TERMS OF THISAGREEMENT, THEN DO NOT DOWNLOAD, INSTALL OR USE THE PRODUCT.License Terms for this Zimbra Collaboration Suite Software:https://www.zimbra.com/license/zimbra-public-eula-2-6.html---------------------------------------------------------------------- |
Agree with the terms of Zimbra. Type Y.
| 1 | Do you agree with the terms of the software license agreement? [N] Y |
Next, allow to user Zimbra’s package repository.
| 1234567891011121314151617181920212223 | Use Zimbra's package repository [Y] YConfiguring package repositoryChecking for installable packagesFound zimbra-core (local)Found zimbra-ldap (local)Found zimbra-logger (local)Found zimbra-mta (local)Found zimbra-dnscache (local)Found zimbra-snmp (local)Found zimbra-store (local)Found zimbra-apache (local)Found zimbra-spell (local)Found zimbra-memcached (repo)Found zimbra-proxy (local)Found zimbra-drive (repo)Found zimbra-imapd (local)Found zimbra-patch (repo)Found zimbra-mta-patch (repo)Found zimbra-proxy-patch (repo) |
After that, type Y to select packages you want to install. We will install these packages: zimbra-ldap, zimbra-logger, zimbra-mta, zimbra-snmp, zimbra-store, zimbra-apache, zimbra-spell, zimbra-memcached, zimbra-proxy.
There are some packages optional: zimbra-drive (use with NextCloud), zimbra-imapd (still BETA), zimbra-chat (not really necessary, users often chat via Skype or some thing like that).
| 12345678910111213141516171819202122232425262728293031323334353637383940414243444546474849 | Select the packages to installInstall zimbra-ldap [Y] YInstall zimbra-logger [Y] YInstall zimbra-mta [Y] YInstall zimbra-dnscache [Y] NInstall zimbra-snmp [Y] YInstall zimbra-store [Y] YInstall zimbra-apache [Y] YInstall zimbra-spell [Y] YInstall zimbra-memcached [Y] YInstall zimbra-proxy [Y] YInstall zimbra-drive [Y] YInstall zimbra-imapd (BETA - for evaluation only) [N] YInstall zimbra-chat [Y] YChecking required space for zimbra-coreChecking space for zimbra-storeChecking required packages for zimbra-storezimbra-store package check complete.Installing: zimbra-core zimbra-ldap zimbra-logger zimbra-mta zimbra-snmp zimbra-store zimbra-apache zimbra-spell zimbra-memcached zimbra-proxy zimbra-drive zimbra-imapd zimbra-patch zimbra-mta-patch zimbra-proxy-patch zimbra-chat |
Now, you might want to ask why for zimbra-dnscache, we choose N. Because we installed the DNS server on the Zimbra server, so we don’t need to install it anymore. If you select Y to install zimbra-dnscache, the installation will fail.
After the above step next, you have to type Y to confirm that the system will be modified and the installation will begin.
| 123456789101112131415161718192021222324252627282930313233343536373839404142434445464748495051525354555657585960616263646566676869707172737475767778798081828384858687888990919293949596979899100101102103104105106107108109110111112113114115116117118 | The system will be modified. Continue? [N] YBeginning Installation - see /tmp/install.log.j5mRhLRW for details... zimbra-core-components will be downloaded and installed. zimbra-timezone-data will be installed. zimbra-common-core-jar will be installed. zimbra-common-mbox-conf will be installed. zimbra-common-mbox-conf-attrs will be installed. zimbra-common-mbox-conf-msgs will be installed. zimbra-common-mbox-conf-rights will be installed. zimbra-common-mbox-db will be installed. zimbra-common-mbox-docs will be installed. zimbra-common-mbox-native-lib will be installed. zimbra-common-core-libs will be installed. zimbra-core will be installed. zimbra-ldap-components will be downloaded and installed. zimbra-ldap will be installed. zimbra-logger will be installed. zimbra-mta-components will be downloaded and installed. zimbra-mta will be installed. zimbra-snmp-components will be downloaded and installed. zimbra-snmp will be installed. zimbra-store-components will be downloaded and installed. zimbra-jetty-distribution will be downloaded and installed. zimbra-mbox-conf will be installed. zimbra-mbox-war will be installed. zimbra-mbox-service will be installed. zimbra-mbox-webclient-war will be installed. zimbra-mbox-admin-console-war will be installed. zimbra-mbox-store-libs will be installed. zimbra-store will be installed. zimbra-apache-components will be downloaded and installed. zimbra-apache will be installed. zimbra-spell-components will be downloaded and installed. zimbra-spell will be installed. zimbra-memcached will be downloaded and installed. zimbra-proxy-components will be downloaded and installed. zimbra-proxy will be installed. zimbra-drive will be downloaded and installed (later). zimbra-imapd will be installed. zimbra-patch will be downloaded and installed (later). zimbra-mta-patch will be downloaded and installed. zimbra-proxy-patch will be downloaded and installed (later). zimbra-chat will be downloaded and installed (later).Downloading packages (11): zimbra-core-components zimbra-ldap-components zimbra-mta-components zimbra-snmp-components zimbra-store-components zimbra-jetty-distribution zimbra-apache-components zimbra-spell-components zimbra-memcached zimbra-proxy-components zimbra-mta-patch ...doneRemoving /opt/zimbraRemoving zimbra crontab entry...done.Cleaning up zimbra init scripts...done.Cleaning up /etc/security/limits.conf...done.Finished removing Zimbra Collaboration Server.Installing repo packages (11): zimbra-core-components zimbra-ldap-components zimbra-mta-components zimbra-snmp-components zimbra-store-components zimbra-jetty-distribution zimbra-apache-components zimbra-spell-components zimbra-memcached zimbra-proxy-components zimbra-mta-patch ...doneInstalling local packages (26): zimbra-timezone-data zimbra-common-core-jar zimbra-common-mbox-conf zimbra-common-mbox-conf-attrs zimbra-common-mbox-conf-msgs zimbra-common-mbox-conf-rights zimbra-common-mbox-db zimbra-common-mbox-docs zimbra-common-mbox-native-lib zimbra-common-core-libs zimbra-core zimbra-ldap zimbra-logger zimbra-mta zimbra-snmp zimbra-mbox-conf zimbra-mbox-war zimbra-mbox-service zimbra-mbox-webclient-war zimbra-mbox-admin-console-war zimbra-mbox-store-libs zimbra-store zimbra-apache zimbra-spell zimbra-proxy zimbra-imapd ...doneInstalling extra packages (4): zimbra-drive zimbra-patch zimbra-proxy-patch zimbra-chat ...done |
Now, it will tell you DNS error resolving MX for mail.yourdomain.com. Answer yes to change domain then type your domain name as shown below.
| 1234567891011121314151617 | Running Post Installation Configuration:Operations logged to /tmp/zmsetup.20190521-125010.logInstalling LDAP configuration database...done.Setting defaults...DNS ERROR resolving MX for mail.yourdomain.comIt is suggested that the domain name have an MX record configured in DNSChange domain name? [Yes] YesCreate domain: [mail.yourdomain.com] yourdomain.com MX: mail.yourdomain.com (192.168.10.10) Interface: 127.0.0.1 Interface: ::1 Interface: 192.168.10.10done.Checking for port conflicts |
The main menu displays for some subsequent settings.
| 123456789101112131415161718192021222324252627282930313233343536373839 | Main menu 1) Common Configuration: 2) zimbra-ldap: Enabled 3) zimbra-logger: Enabled 4) zimbra-mta: Enabled 5) zimbra-snmp: Enabled 6) zimbra-store: Enabled +Create Admin User: yes +Admin user to create: admin@yourdomain.com******* +Admin Password UNSET +Anti-virus quarantine user: virus-quarantine.exqbgv28@yourdomain.com +Enable automated spam training: yes +Spam training user: spam.qg1kjm_q@yourdomain.com +Non-spam(Ham) training user: ham.cuhpcmq7h@yourdomain.com +SMTP host: mail.yourdomain.com +Web server HTTP port: 8080 +Web server HTTPS port: 8443 +Web server mode: https +IMAP server port: 7143 +IMAP server SSL port: 7993 +POP server port: 7110 +POP server SSL port: 7995 +Use spell check server: yes +Spell server URL: http://mail.yourdomain.com:7780/aspell.php +Enable version update checks: TRUE +Enable version update notifications: TRUE +Version update notification email: admin@yourdomain.com +Version update source email: admin@yourdomain.com +Install mailstore (service webapp): yes +Install UI (zimbra,zimbraAdmin webapps): yes 7) zimbra-spell: Enabled 8) zimbra-proxy: Enabled 9) zimbra-imapd: Enabled 10) Default Class of Service Configuration: s) Save config to file x) Expand menu q) Quit |
Choose number 6.
| 1234567891011121314151617181920212223242526272829 | Address unconfigured (**) items (? - help) 6Store configuration 1) Status: Enabled 2) Create Admin User: yes 3) Admin user to create: admin@yourdomain.com** 4) Admin Password UNSET 5) Anti-virus quarantine user: virus-quarantine.exqbgv28@yourdomain.com 6) Enable automated spam training: yes 7) Spam training user: spam.qg1kjm_q@yourdomain.com 8) Non-spam(Ham) training user: ham.cuhpcmq7h@yourdomain.com 9) SMTP host: mail.yourdomain.com 10) Web server HTTP port: 8080 11) Web server HTTPS port: 8443 12) Web server mode: https 13) IMAP server port: 7143 14) IMAP server SSL port: 7993 15) POP server port: 7110 16) POP server SSL port: 7995 17) Use spell check server: yes 18) Spell server URL: http://mail.yourdomain.com:7780/aspell.php 19) Enable version update checks: TRUE 20) Enable version update notifications: TRUE 21) Version update notification email: admin@yourdomain.com 22) Version update source email: admin@yourdomain.com 23) Install mailstore (service webapp): yes 24) Install UI (zimbra,zimbraAdmin webapps): yes |
Then choose number 4 and type your new password for admin account.
| 123456789101112131415161718192021222324252627282930 | Select, or 'r' for previous menu [r] 4Password for admin@yourdomain.com (min 6 characters): [BxHjiQg8m9] YourNewPassStore configuration 1) Status: Enabled 2) Create Admin User: yes 3) Admin user to create: admin@yourdomain.com 4) Admin Password set 5) Anti-virus quarantine user: virus-quarantine.exqbgv28@yourdomain.com 6) Enable automated spam training: yes 7) Spam training user: spam.qg1kjm_q@yourdomain.com 8) Non-spam(Ham) training user: ham.cuhpcmq7h@yourdomain.com 9) SMTP host: mail.yourdomain.com 10) Web server HTTP port: 8080 11) Web server HTTPS port: 8443 12) Web server mode: https 13) IMAP server port: 7143 14) IMAP server SSL port: 7993 15) POP server port: 7110 16) POP server SSL port: 7995 17) Use spell check server: yes 18) Spell server URL: http://mail.yourdomain.com:7780/aspell.php 19) Enable version update checks: TRUE 20) Enable version update notifications: TRUE 21) Version update notification email: admin@yourdomain.com 22) Version update source email: admin@yourdomain.com 23) Install mailstore (service webapp): yes 24) Install UI (zimbra,zimbraAdmin webapps): yes |
And type r to return previous menu.
| 1234567891011121314151617 | Select, or 'r' for previous menu [r] rMain menu 1) Common Configuration: 2) zimbra-ldap: Enabled 3) zimbra-logger: Enabled 4) zimbra-mta: Enabled 5) zimbra-snmp: Enabled 6) zimbra-store: Enabled 7) zimbra-spell: Enabled 8) zimbra-proxy: Enabled 9) zimbra-imapd: Enabled 10) Default Class of Service Configuration: s) Save config to file x) Expand menu q) Quit |
Then type a to apply configuration.
| 123456789101112131415161718192021222324252627282930313233343536373839404142434445464748495051525354555657585960616263646566676869707172737475767778798081828384858687888990919293949596979899100101102103104105 | *** CONFIGURATION COMPLETE - press 'a' to applySelect from menu, or press 'a' to apply config (? - help) aSave configuration data to a file? [Yes] YesSave config in file: [/opt/zimbra/config.16118]Saving config in /opt/zimbra/config.16118...done.The system will be modified - continue? [No] YesOperations logged to /tmp/zmsetup.20190521-125010.logSetting local config values...done.Initializing core config...Setting up CA...done.Deploying CA to /opt/zimbra/conf/ca ...done.Creating SSL zimbra-imapd certificate...done.Creating new zimbra-store SSL certificate...done.Creating new zimbra-ldap SSL certificate...done.Creating new zimbra-mta SSL certificate...done.Creating new zimbra-proxy SSL certificate...done.Installing mailboxd SSL certificates...done.Installing imapd SSL certificates...done.Installing MTA SSL certificates...done.Installing LDAP SSL certificate...done.Installing Proxy SSL certificate...done.Initializing ldap...done.Setting replication password...done.Setting Postfix password...done.Setting amavis password...done.Setting nginx password...done.Setting BES searcher password...done.Creating server entry for mail.yourdomain.com...done.Setting Zimbra IP Mode...done.Saving CA in ldap...done.Saving SSL Certificate in ldap...done.Setting spell check URL...done.Setting service ports on mail.yourdomain.com...done.Setting zimbraFeatureTasksEnabled=TRUE...done.Setting zimbraFeatureBriefcasesEnabled=TRUE...done.Checking current setting of zimbraReverseProxyAvailableLookupTargetsQuerying LDAP for other mailstoresSearching LDAP for reverseProxyLookupTargets...done.Adding mail.yourdomain.com to zimbraReverseProxyAvailableLookupTargetsUpdating zimbraLDAPSchemaVersion to version '1537783098'Setting TimeZone Preference...done.Disabling strict server name enforcement on mail.yourdomain.com...done.Initializing mta config...done.Setting services on mail.yourdomain.com...done.Adding mail.yourdomain.com to zimbraMailHostPool in default COS...done.Creating domain yourdomain.com...done.Setting default domain name...done.Creating domain yourdomain.com...already exists.Creating admin account admin@yourdomain.com...done.Creating root alias...done.Creating postmaster alias...done.Creating user spam.qg1kjm_q@yourdomain.com...done.Creating user ham.cuhpcmq7h@yourdomain.com...done.Creating user virus-quarantine.exqbgv28@yourdomain.com...done.Setting spam training and Anti-virus quarantine accounts...done.Initializing store sql database...done.Setting zimbraSmtpHostname for mail.yourdomain.com...done.Configuring SNMP...done.Setting up syslog.conf...done.Enabling IMAP protocol for zimbra-imapd service...done.Enabling IMAPS protocol for zimbra-imapd service...done.Starting servers...done.Installing common zimlets... com_zimbra_adminversioncheck...done. com_zimbra_attachcontacts...done. com_zimbra_attachmail...done. com_zimbra_bulkprovision...done. com_zimbra_cert_manager...done. com_zimbra_clientuploader...done. com_zimbra_date...done. com_zimbra_email...done. com_zimbra_mailarchive...done. com_zimbra_phone...done. com_zimbra_proxy_config...done. com_zimbra_srchhighlighter...done. com_zimbra_tooltip...done. com_zimbra_url...done. com_zimbra_viewmail...done. com_zimbra_webex...done. com_zimbra_ymemoticons...done. com_zextras_drive_open...done. com_zextras_chat_open...done.Finished installing common zimlets.Restarting mailboxd...done.Creating galsync account for default domain...done.You have the option of notifying Zimbra of your installation.This helps us to track the uptake of the Zimbra Collaboration Server.The only information that will be transmitted is: The VERSION of zcs installed (8.8.12_GA_3794_RHEL7_64) The ADMIN EMAIL ADDRESS created (admin@yourdomain.com)Notify Zimbra of your installation? [Yes] YesNotifying Zimbra of installation via http://www.zimbra.com/cgi-bin/notify.cgi?VER=8.8.12_GA_3794_RHEL7_64&MAIL=admin@yourdomain.comNotification completeChecking if the NG started running...done.Setting up zimbra crontab...done.Moving /tmp/zmsetup.20190521-125010.log to /opt/zimbra/logConfiguration complete - press return to exit |
At last installation will begin and you just need to wait about 5-10 minutes for it to finish.
After the installation has finished, you switch to user Zimbra to check the Zimbra service status.
| 1234567891011121314151617181920212223 | [root@mail ~]# su zimbra[zimbra@mail root]$ zmcontrol statusHost mail.yourdomain.com amavis Running antispam Running antivirus Running imapd Running ldap Running logger Running mailbox Running memcached Running mta Running opendkim Running proxy Running service webapp Running snmp Running spell Running stats Running zimbra webapp Running zimbraAdmin webapp Running zimlet webapp Running zmconfigd Running[zimbra@mail root]$ |
Open the firewall port for Zimbra
For CentOS 7, it uses firewalld. Type the following commands to open the necessary ports for Zimbra.
| 12345 | [root@mail ~]# firewall-cmd --permanent --add-port={25,80,110,143,443,465,587,993,995,5222,5223,9071,7071}/tcpsuccess[root@mail ~]# firewall-cmd --reloadsuccess[root@mail ~]# |
Warning: Note that port 7071 is for admin.
Access the Zimbra admin for the first time
Now, open your browser and type in the url: https://mail.yourdomain.com:7071
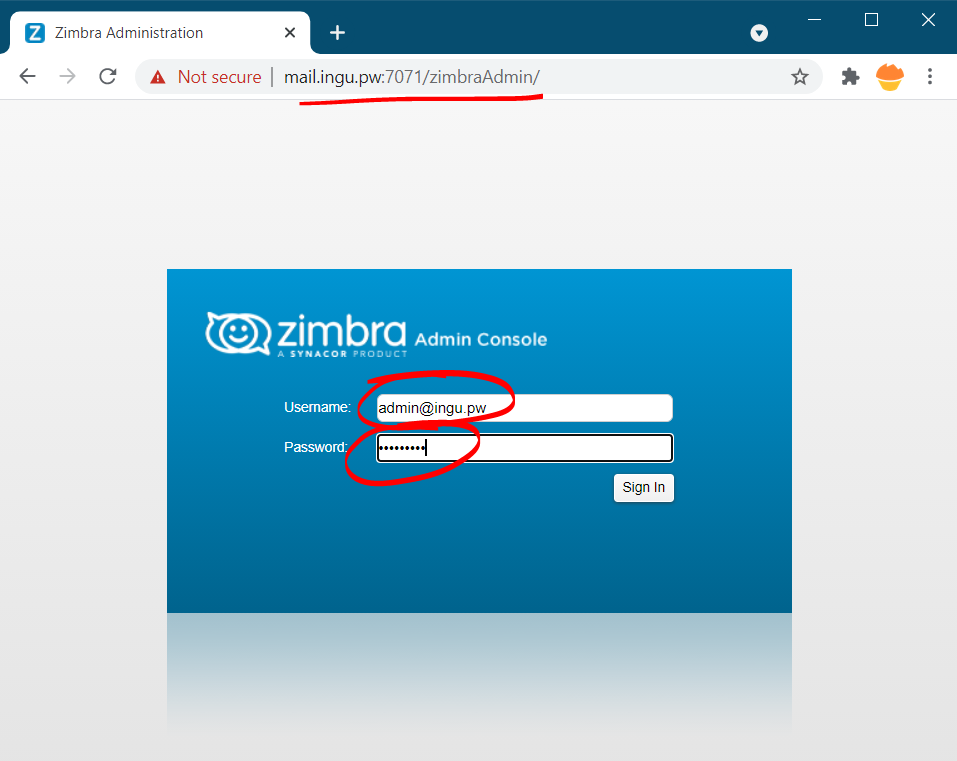
Then, login your admin account.
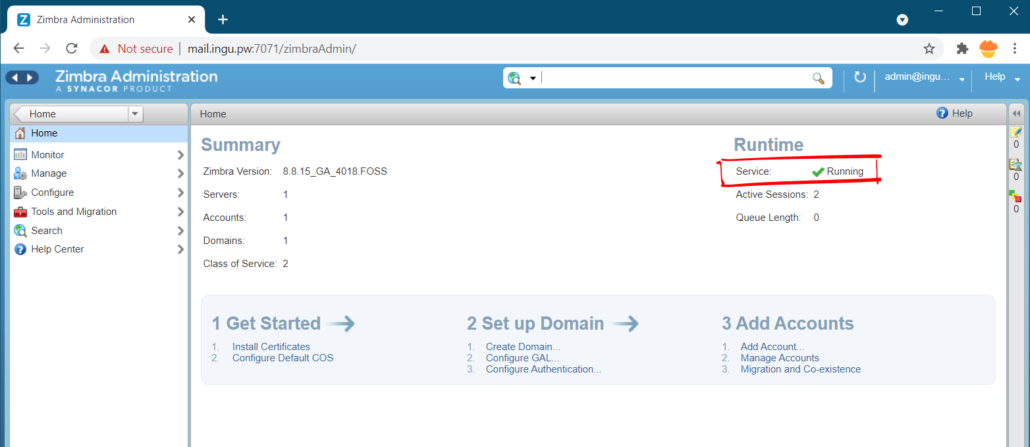
Notice the upper right corner of the window, the Service section should be Running. Or you can wait for 1-2 minutes for the window to update the status.
If you still don’t run, you need to restart the Zimbra service.
Post Installation Configurations:
You need to do some post-installation configurations, though not mandatory it’s advisable to do so. When we install Zimbra it creates a system user Zimbra with a disabled password. Actually, it uses ssh keys to connect. Therefore, we need to update the ssh keys as follows.
| 123456 | [root@zimbra-01 ~]# sudo -u zimbra -i[zimbra@zimbra-01 ~]$ zmupdateauthkeysUpdating keys for zimbra-01.example.comFetching key for zimbra-01.example.comUpdating keys for zimbra-01.example.comUpdating /opt/zimbra/.ssh/authorized_keys |
Now, to display server statistics on the Admin console, we need to update the Syslog configuration files as follows.
If you working as Zimbra user exit (execute command exit) to switch to root user and execute the following command.
| 12 | [root@zimbra-01 ~]# /opt/zimbra/libexec/zmsyslogsetupupdateSyslog: Updating /etc/rsyslog.conf...done. |
It’s desirable to enable automatic scanning of email attachments using ClamAV antivirus. Therefore, execute the following command.
| 123 | [root@zimbra-01 ~]# su - zimbra[zimbra@zimbra-01 ~]$ zmprov mcf zimbraAttachmentsScanURL clam://localhost:3310/[zimbra@zimbra-01 ~]$ zmprov mcf zimbraAttachmentsScanEnabled TRUE |
Final Domain Setup
In the beginning, we already created 2 DNS records. But, we also need to create DKIM, DMARC, SPF records as well as finish the setup. Let’s begin.
Generate DKIM key on Zimbra
First, you need to switch to Zimbra user with the following command.
| 12 | [root@mail ~]# su zimbra[zimbra@mail root]$ |
Now, to add DKIM data to the new domain, run the following command.
| 1 | [zimbra@mail root]$ /opt/zimbra/libexec/zmdkimkeyutil -a -d yourdomain.com |
The result of the command will look like this.
| 123456 | [zimbra@mail root]$ /opt/zimbra/libexec/zmdkimkeyutil -a -d yourdomain.comDKIM Data added to LDAP for domain yourdomain.com with selector 5FB56121-7BDF-21E9-8459-20D59831E3ABPublic signature to enter into DNS:5FB56121-7BDF-21E9-8459-20D59831E3AB._domainkey IN TXT ( "v=DKIM1; k=rsa; " "p=MIIBIjANBgkqhkiG9w0BAQEFAAOCAQ8AMIIBCgKCAQEAzOxcXN4jDK3h/OIZsLSmSh7HtbVFN3b1bzF5aj9CVgre1Ql025/AC1yO3Y5qsp6+scHDKl5VH8G/v/bKep6efRzINieg+OP3CurGz1mrJNp10jz8Yioe47NM5IIcwDeTuwKtoYRrmGcPRQUjerWkO9NH4w62oOR3vEYgzycQTm7vlVtgfbeH3YnzxeeEN4HwjVHUH8t47CPnGw" "8JRHYKb+y3X2h/UoZP2rP359U4KLuD12EEL5ewDSRgAbh1FLNgSb4bglGzBRResvq6rSlqNEwuJJz9oD4vg84NnN4uWctncbYFpxF3euyNGydJ3y6UrJoz37a5S5MRgmGV4h9J/wIDAQAB" ) ; ----- DKIM key 5FB56121-7BDF-21E9-8459-20D59831E3AB for yourdomain.com |
So, now DKIM key has been generated, it’s time to add it to DNS records.
| Type | Host | Value |
| TXT | 5FB56121-7BDF-21E9-8459-20D59831E3AB._domainkey | “v=DKIM1; k=rsa; “ “p=MIIBIjANBgkqhkiG9w0BAQ….. |
If you want to retrieve, update or delete DKIM key in the future you can check the detailed guide on DKIM page of Zimbra. I just demonstrated one use of zmdkimkeyutil tool that allows you to create, update, query, and delete DKIM of a domain in Zimbra.
Create DMARC record for Zimbra
You can create DMARC record either online or manually. To generate DMARC records online you can follow this article. For manual creation just copy the following record and don’t forget to replace yourdomain.com
| Type | Host | Value |
| TXT | _dmarc | v=DMARC1; p=quarantine; rua=mailto:dmarc@yourdomain.com; ruf=mailto:dmarc@yourdomain.com; sp=quarantine |
Create SPF record for Zimbra
Once again to create SPF record online you can follow my article or to create it manually, just copy the following record and edit the domain name and IP address.
| Type | Host | Value |
| TXT | @ | v=spf1 a mx a:mail.yourdomain.com ip4:192.168.10.10 ~all |
Lorem ipsum dolor sit amet, consectetuer adipiscing elit. Aenean commodo ligula eget dolor. Aenean massa. Cum sociis natoque penatibus et magnis dis parturient montes, nascetur ridiculus mus. Donec quam felis, ultricies nec, pellentesque eu, pretium quis, sem. Nulla consequat massa quis enim.
Lorem ipsum dolor sit amet, consectetuer adipiscing elit. Aenean commodo ligula eget dolor. Aenean massa. Cum sociis natoque penatibus.
]]>Donec quam felis, ultricies nec, pellentesque eu, pretium quis, sem. Nulla consequat massa quis enim. Donec pede justo, fringilla vel, aliquet nec, vulputate eget, arcu. In enim justo, rhoncus ut, imperdiet a, venenatis vitae, justo. Nullam dictum felis eu pede mollis pretium. Integer tincidunt. Cras dapibus. Vivamus elementum semper nisi.
Aenean vulputate eleifend tellus. Aenean leo ligula, porttitor eu, consequat vitae, eleifend ac, enim. Aliquam lorem ante, dapibus in, viverra quis, feugiat a, tellus. Phasellus viverra nulla ut metus varius laoreet.
- Quisque rutrum. Aenean imperdiet.
- Etiam ultricies nisi vel augue.
- Curabitur ullamcorper ultricies nisi.
- Nam eget dui. Etiam rhoncus.
[quote float=”left”]Aenean vulputate eleifend tellus. Aenean leo ligula, porttitor eu, consequat vitae, eleifend ac, enim.[/quote] Donec quam felis, ultricies nec, pellentesque eu, pretium quis, sem. Nulla consequat massa quis enim. Donec pede justo, fringilla vel, aliquet nec, vulputate eget, arcu. In enim justo, rhoncus ut, imperdiet a, venenatis vitae, justo. Nullam dictum felis eu pede mollis pretium. Integer tincidunt. Cras dapibus. Vivamus elementum semper nisi.
]]>Donec quam felis, ultricies nec, pellentesque eu, pretium quis, sem.
Nulla consequat massa quis enim. Donec pede justo, fringilla vel, aliquet nec, vulputate eget, arcu. In enim justo, rhoncus ut, imperdiet a, venenatis vitae, justo.
Lorem ipsum dolor sit amet, consectetuer adipiscing elit. Aenean commodo ligula eget dolor. Aenean massa. Cum sociis natoque penatibus et magnis dis parturient montes, nascetur ridiculus mus.
]]>Donec quam felis, ultricies nec, pellentesque eu, pretium quis, sem.
Nulla consequat massa quis enim. Donec pede justo, fringilla vel, aliquet nec, vulputate eget, arcu. In enim justo, rhoncus ut, imperdiet a, venenatis vitae, justo.
Nullam dictum felis eu pede mollis pretium. Integer tincidunt. Cras dapibus. Vivamus elementum semper nisi. Aenean vulputate eleifend tellus. Aenean leo ligula, porttitor eu, consequat vitae, eleifend ac, enim. Aliquam lorem ante, dapibus in, viverra quis, feugiat a, tellus.
[quote float=”left”]Lorem ipsum dolor sit amet, consectetuer adipiscing elit. Aenean commodo ligula eget dolor. Aenean massculus mus.[/quote] Donec quam felis, ultricies nec, pellentesque eu, pretium quis, sem.
Nulla consequat massa quis enim. Donec pede justo, fringilla vel, aliquet nec, vulputate eget, arcu. In enim justo, rhoncus ut, imperdiet a, venenatis vitae, justo.
Nullam dictum felis eu pede mollis pretium. Integer tincidunt. Cras dapibus. Vivamus elementum semper nisi. Aenean vulputate eleifend tellus. Aenean leo ligula, porttitor eu, consequat vitae, eleifend ac, enim. Aliquam lorem ante, dapibus in, viverra quis, feugiat a, tellus.
Nullam dictum felis eu pede mollis pretium. Integer tincidunt. Cras dapibus. Vivamus elementum semper nisi. Aenean vulputate eleifend tellus. Aenean leo ligula, porttitor eu, consequat vitae, eleifend ac, enim. Aliquam lorem ante, dapibus in, viverra quis, feugiat a, tellus.
]]>Donec quam felis, ultricies nec, pellentesque eu, pretium quis, sem.
Nulla consequat massa quis enim. Donec pede justo, fringilla vel, aliquet nec, vulputate eget, arcu. In enim justo, rhoncus ut, imperdiet a, venenatis vitae, justo.
Nullam dictum felis eu pede mollis pretium. Integer tincidunt. Cras dapibus. Vivamus elementum semper nisi. Aenean vulputate eleifend tellus. Aenean leo ligula, porttitor eu, consequat vitae, eleifend ac, enim. Aliquam lorem ante, dapibus in, viverra quis, feugiat a, tellus.
]]>Donec quam felis, ultricies nec, pellentesque eu, pretium quis, sem.
Nulla consequat massa quis enim. Donec pede justo, fringilla vel, aliquet nec, vulputate eget, arcu. In enim justo, rhoncus ut, imperdiet a, venenatis vitae, justo.
Nullam dictum felis eu pede mollis pretium. Integer tincidunt. Cras dapibus. Vivamus elementum semper nisi. Aenean vulputate eleifend tellus. Aenean leo ligula, porttitor eu, consequat vitae, eleifend ac, enim. Aliquam lorem ante, dapibus in, viverra quis, feugiat a, tellus.
]]>
Duis aute irure dolor in reprehenderit in voluptate velit esse cillum dolore eu fugiat nulla pariatur. Excepteur sint occaecat cupidatat non proident, sunt in culpa qui officia deserunt mollit anim id est laborum.
Lorem ipsum dolor sit amet, consectetur adipisicing elit, sed do eiusmod tempor incididunt ut labore et dolore magna aliqua. Ut enim ad minim veniam, quis nostrud exercitation ullamco laboris nisi
]]>Lorem ipsum dolor sit amet, consectetur adipisicing elit, sed do eiusmod tempor incididunt ut labore et dolore magna aliqua.
Duis aute irure dolor in reprehenderit in voluptate velit esse cillum dolore eu fugiat nulla pariatur. Excepteur sint occaecat cupidatat non proident, sunt in culpa qui officia deserunt mollit anim id est laborum.

Lorem ipsum dolor sit amet, consectetur adipisicing elit, sed do eiusmod tempor incididunt ut labore et dolore magna aliqua. Ut enim ad minim veniam, quis nostrud exercitation ullamco laboris nisi
]]>